Workflow Studio: How to Change Background for Products (Tutorial)
Stop paying for expensive photo studios. This step-by-step guide shows you how to build a reusable template in BananaPro AI Workflow Studio that transforms plain product photos into stunning, marketplace-ready images — in bulk.
Customers can't touch your product online — all they have is the image. Attractive visuals make your products stand out from a sea of identical listings. But getting consistent, high-quality imagery across dozens of SKUs is expensive, slow, and hard to scale.
You've probably tried to find the most cost-effective approach: hiring freelance photographers, renting studio time, or spending hours in Photoshop. Each comes with its own tradeoffs in quality, speed, and cost. Here's what that reality actually looks like:
| Traditional Approach | BananaPro AI Workflow Studio |
|---|---|
| Studio rental: $300–800/day | Start free, 10 credits on sign-up |
| 50 SKUs = 2–3 weeks turnarounda | 50 SKUs in one afternoon |
| Reshoots for each seasonal campaign | Seasonal refresh with one prompt change |
| Inconsistent quality across batches | Consistent output from reusable template |
| One style — can't A/B test scenes | 4 variants per click for A/B testing |
What Is Banana Pro AI Workflow Studio?
Banana Pro AI Workflow Studio is a free visual infinite canvas — think of it as an infinite canvas (whiteboard) where you place AI functions as "nodes", connect them visually, and build a complete production pipeline from raw product photo to finished, marketplace-ready image. No coding. No technical knowledge. Just drag, drop, and describe what you want.
Every project is auto-saved in real time, and all generated images are stored in your history panel, ready to reuse at any moment.
For BananaPro AI background changer workflow studio:
Upload → Text → Settings → Drag Node → Output
Build Your Background Changer Workflow Studio — Step by Step
Follow these steps to create your first AI background changer workflow studio and get how to change background for your products. Once built, you'll save it as a reusable template.
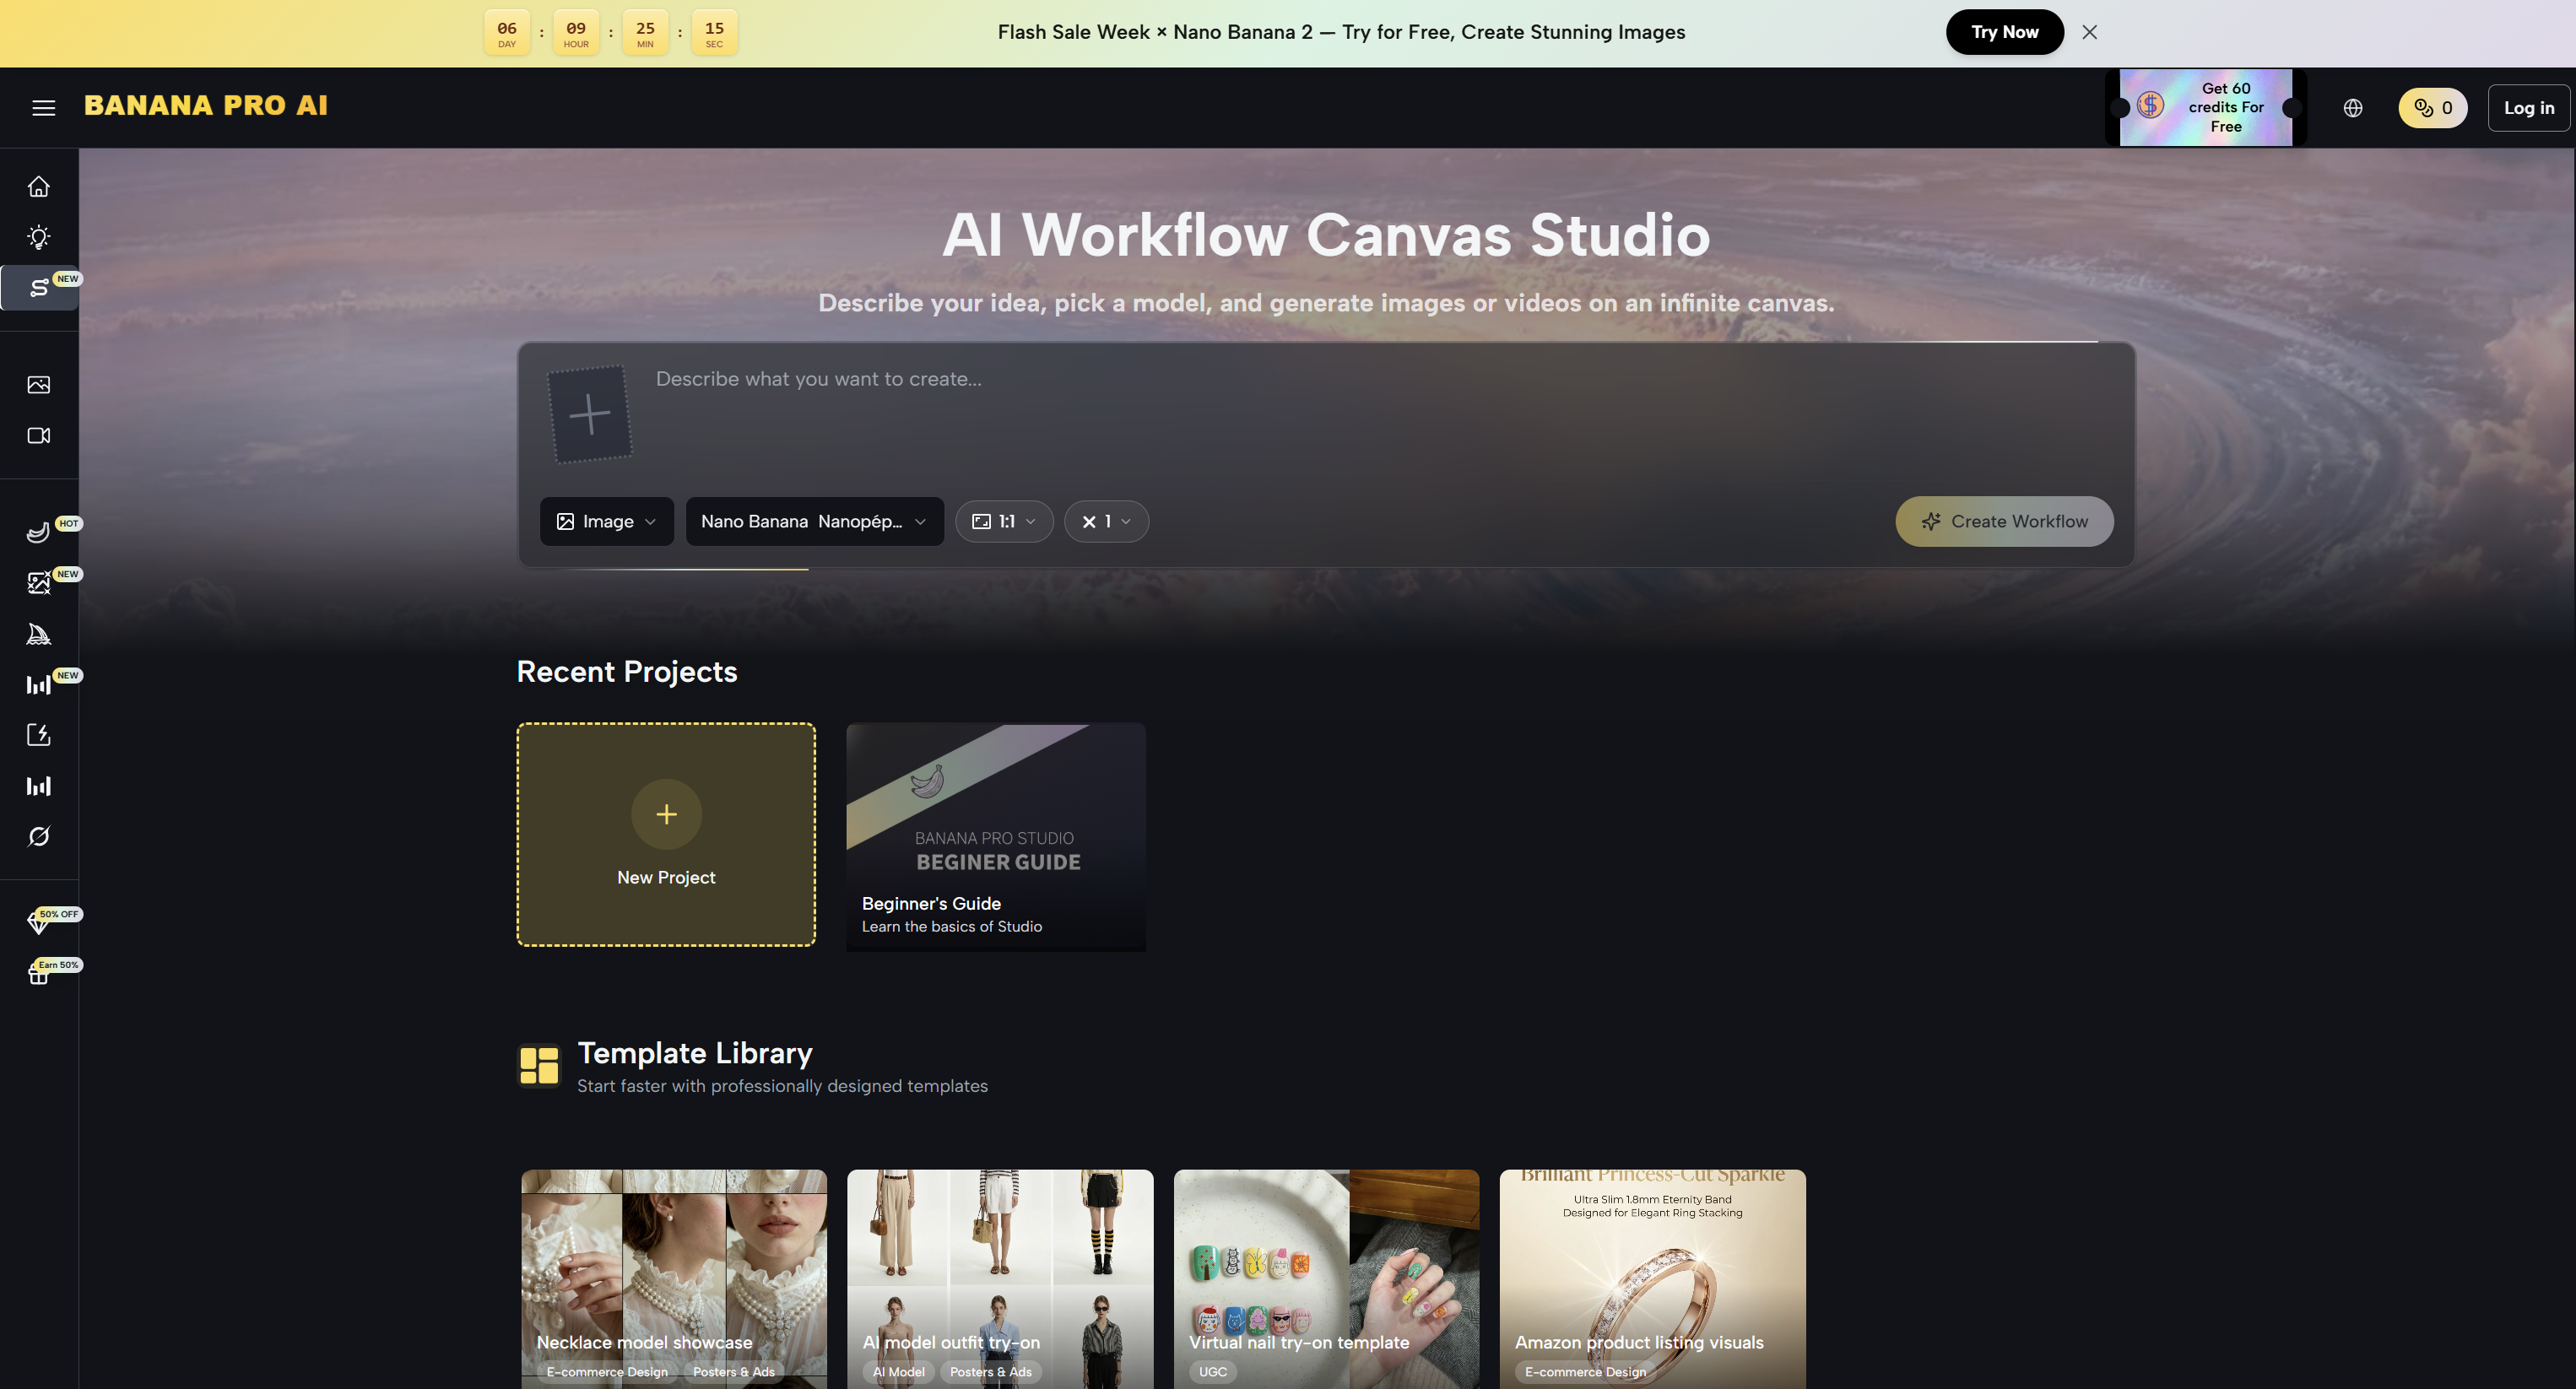
Step 1 — Set Up Your Canvas
Go to BananaPro AI Workflow Studio
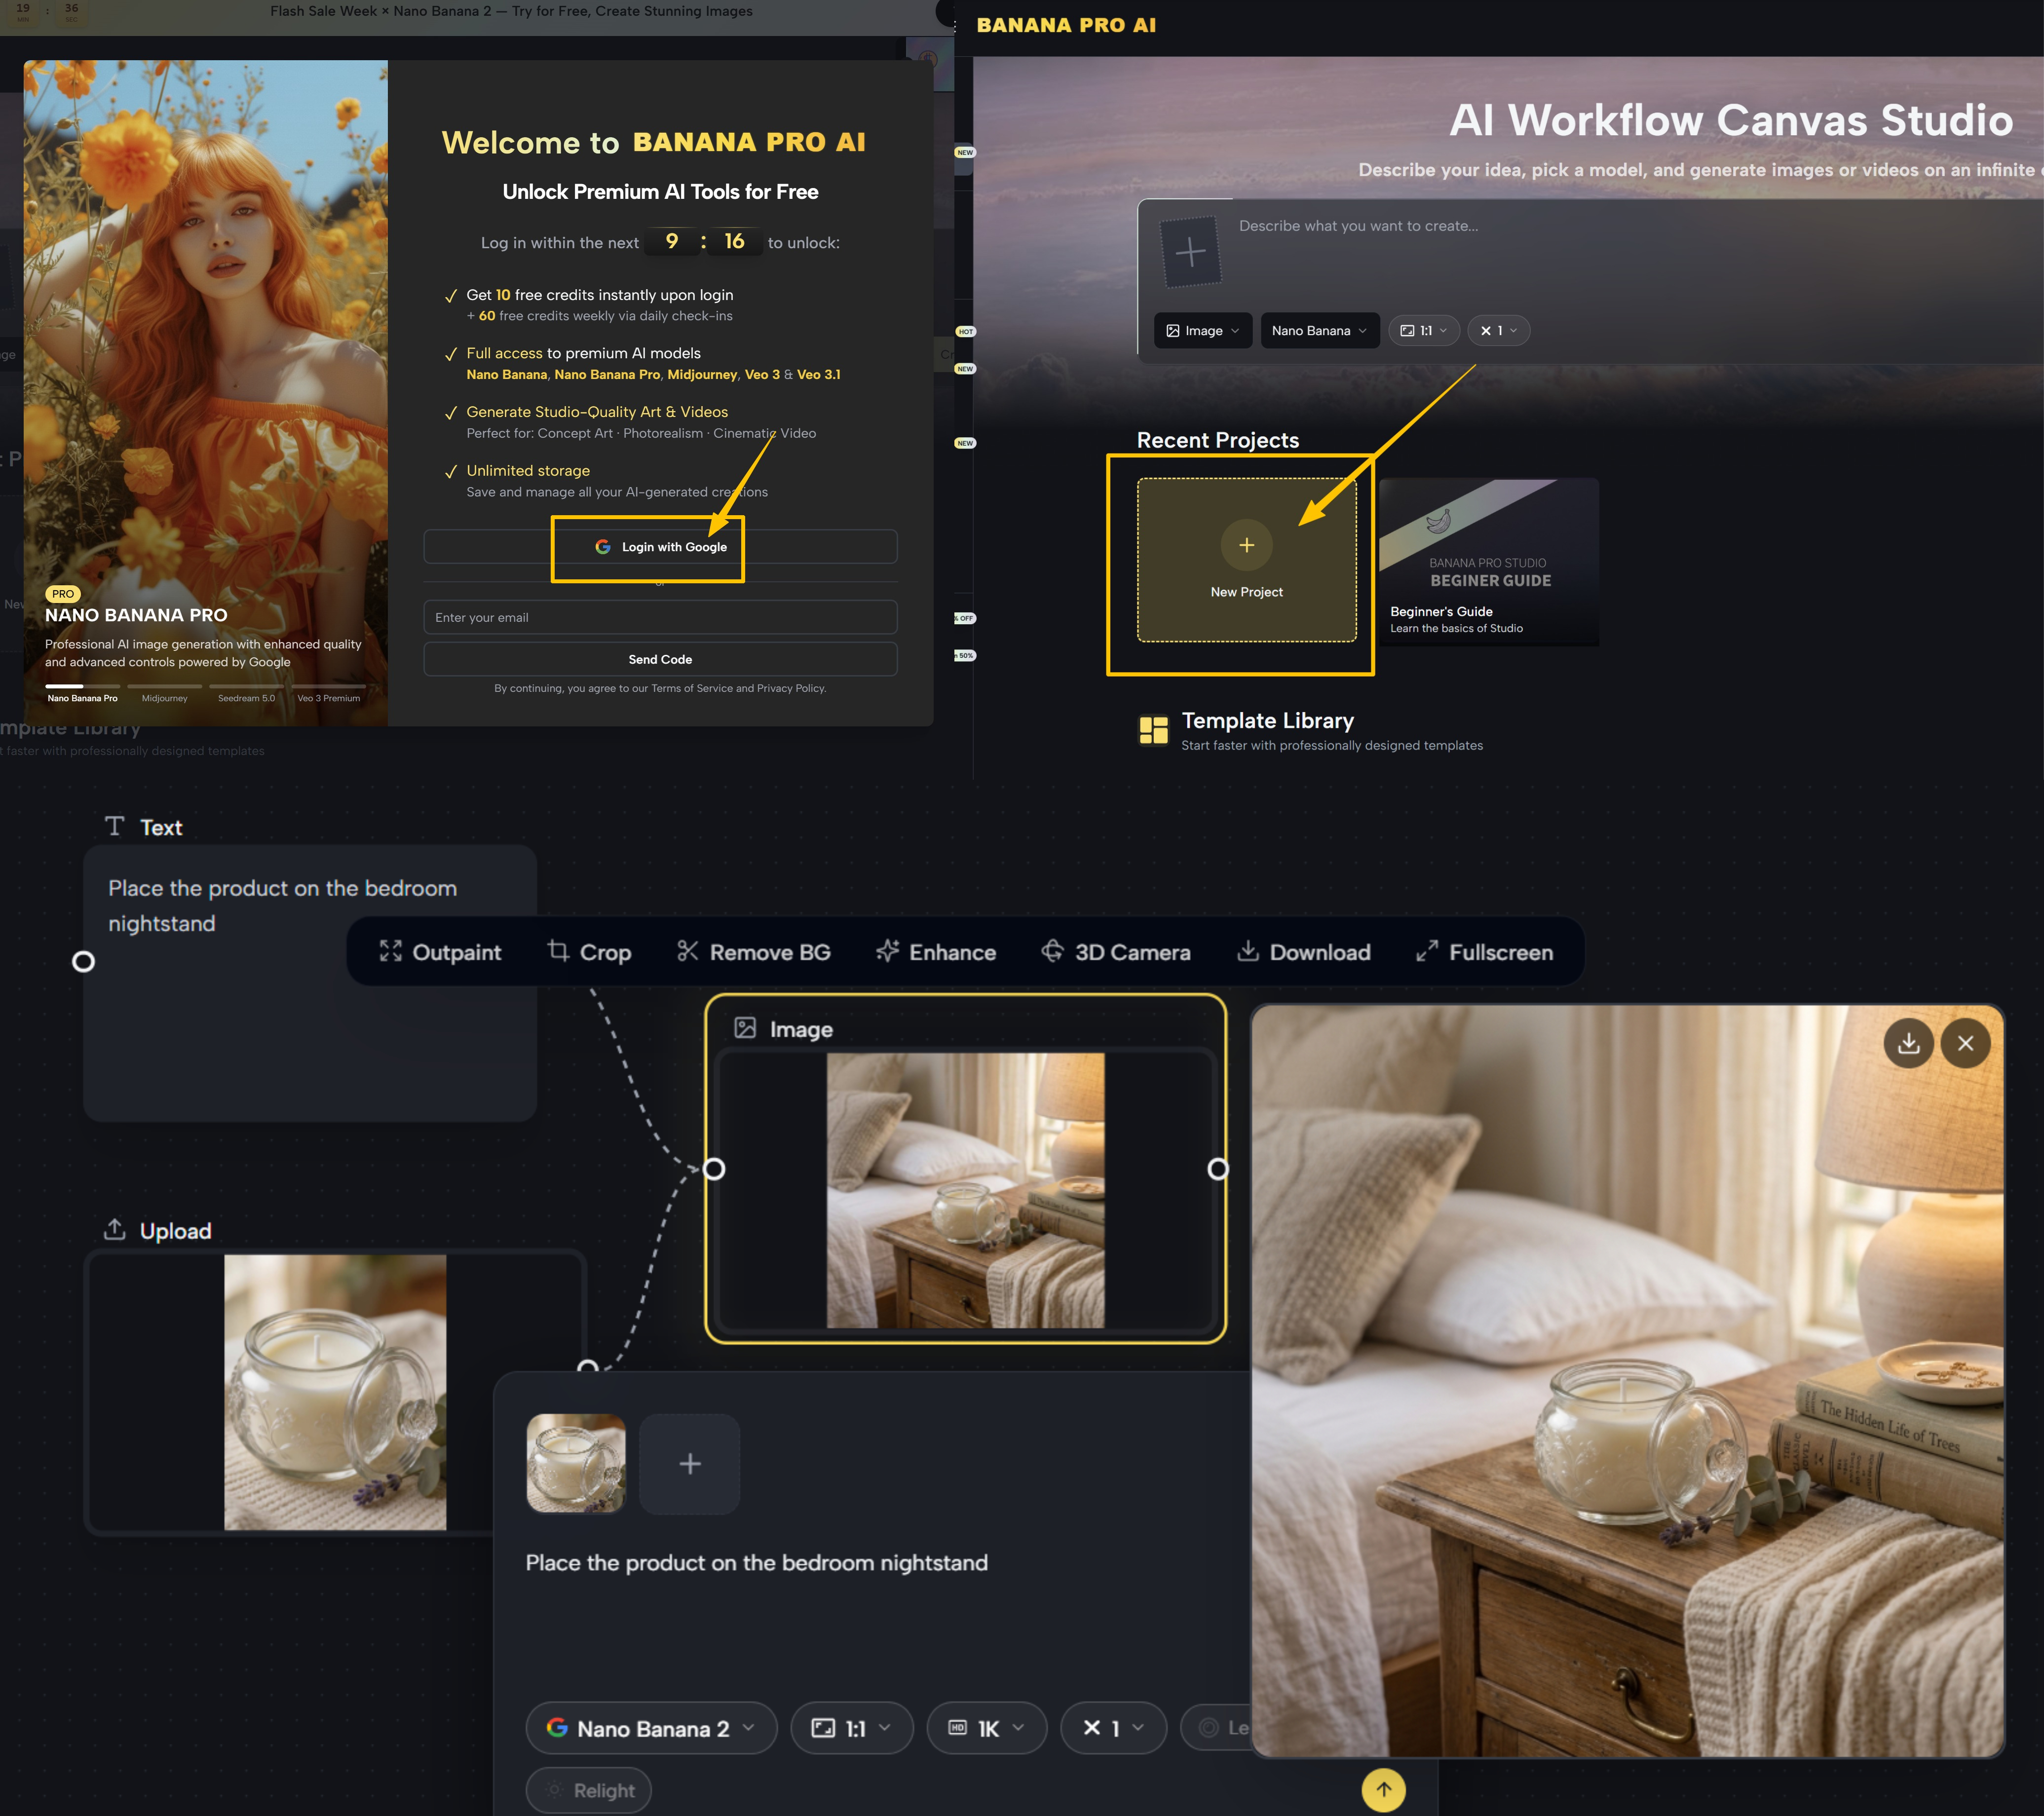
Navigate to BananaPro AI Workflow Studio and create a free account (no credit card required). You'll receive 10 free credits on sign-up, which is enough to test your first workflow studio immediately.
Build a New Project
On the Studio infinite canvas board, click the frame with title of "New Project" to start your AI background changer workflow studio. Then click the "image icon" in the left sidebar to begin adding your first node.
Upload the Product Image
Upload random product image and type the text prompt to change background as you want.
e.g. "Place the product on the bedroom nightstand".
Choose Basic Settings
Select the image generator tool (Nano Banana 2 recommended for e-commerce) and set the image size for your needs. Additionally, you may choose the resolution (1K to 4K) and how many variants to generate (up to 4 at once for side-by-side comparison).
Step 2 — Add the Image Edit Node
Drag the Image Node
After the background changing, drag the right node of the image then you will see new features, including "Image to Image", " Image to Video", and "Image to Text". Click "Image to Image" to create a new generation frame that takes your current output as its source — this is where you'll apply the next background change or scene refinement.
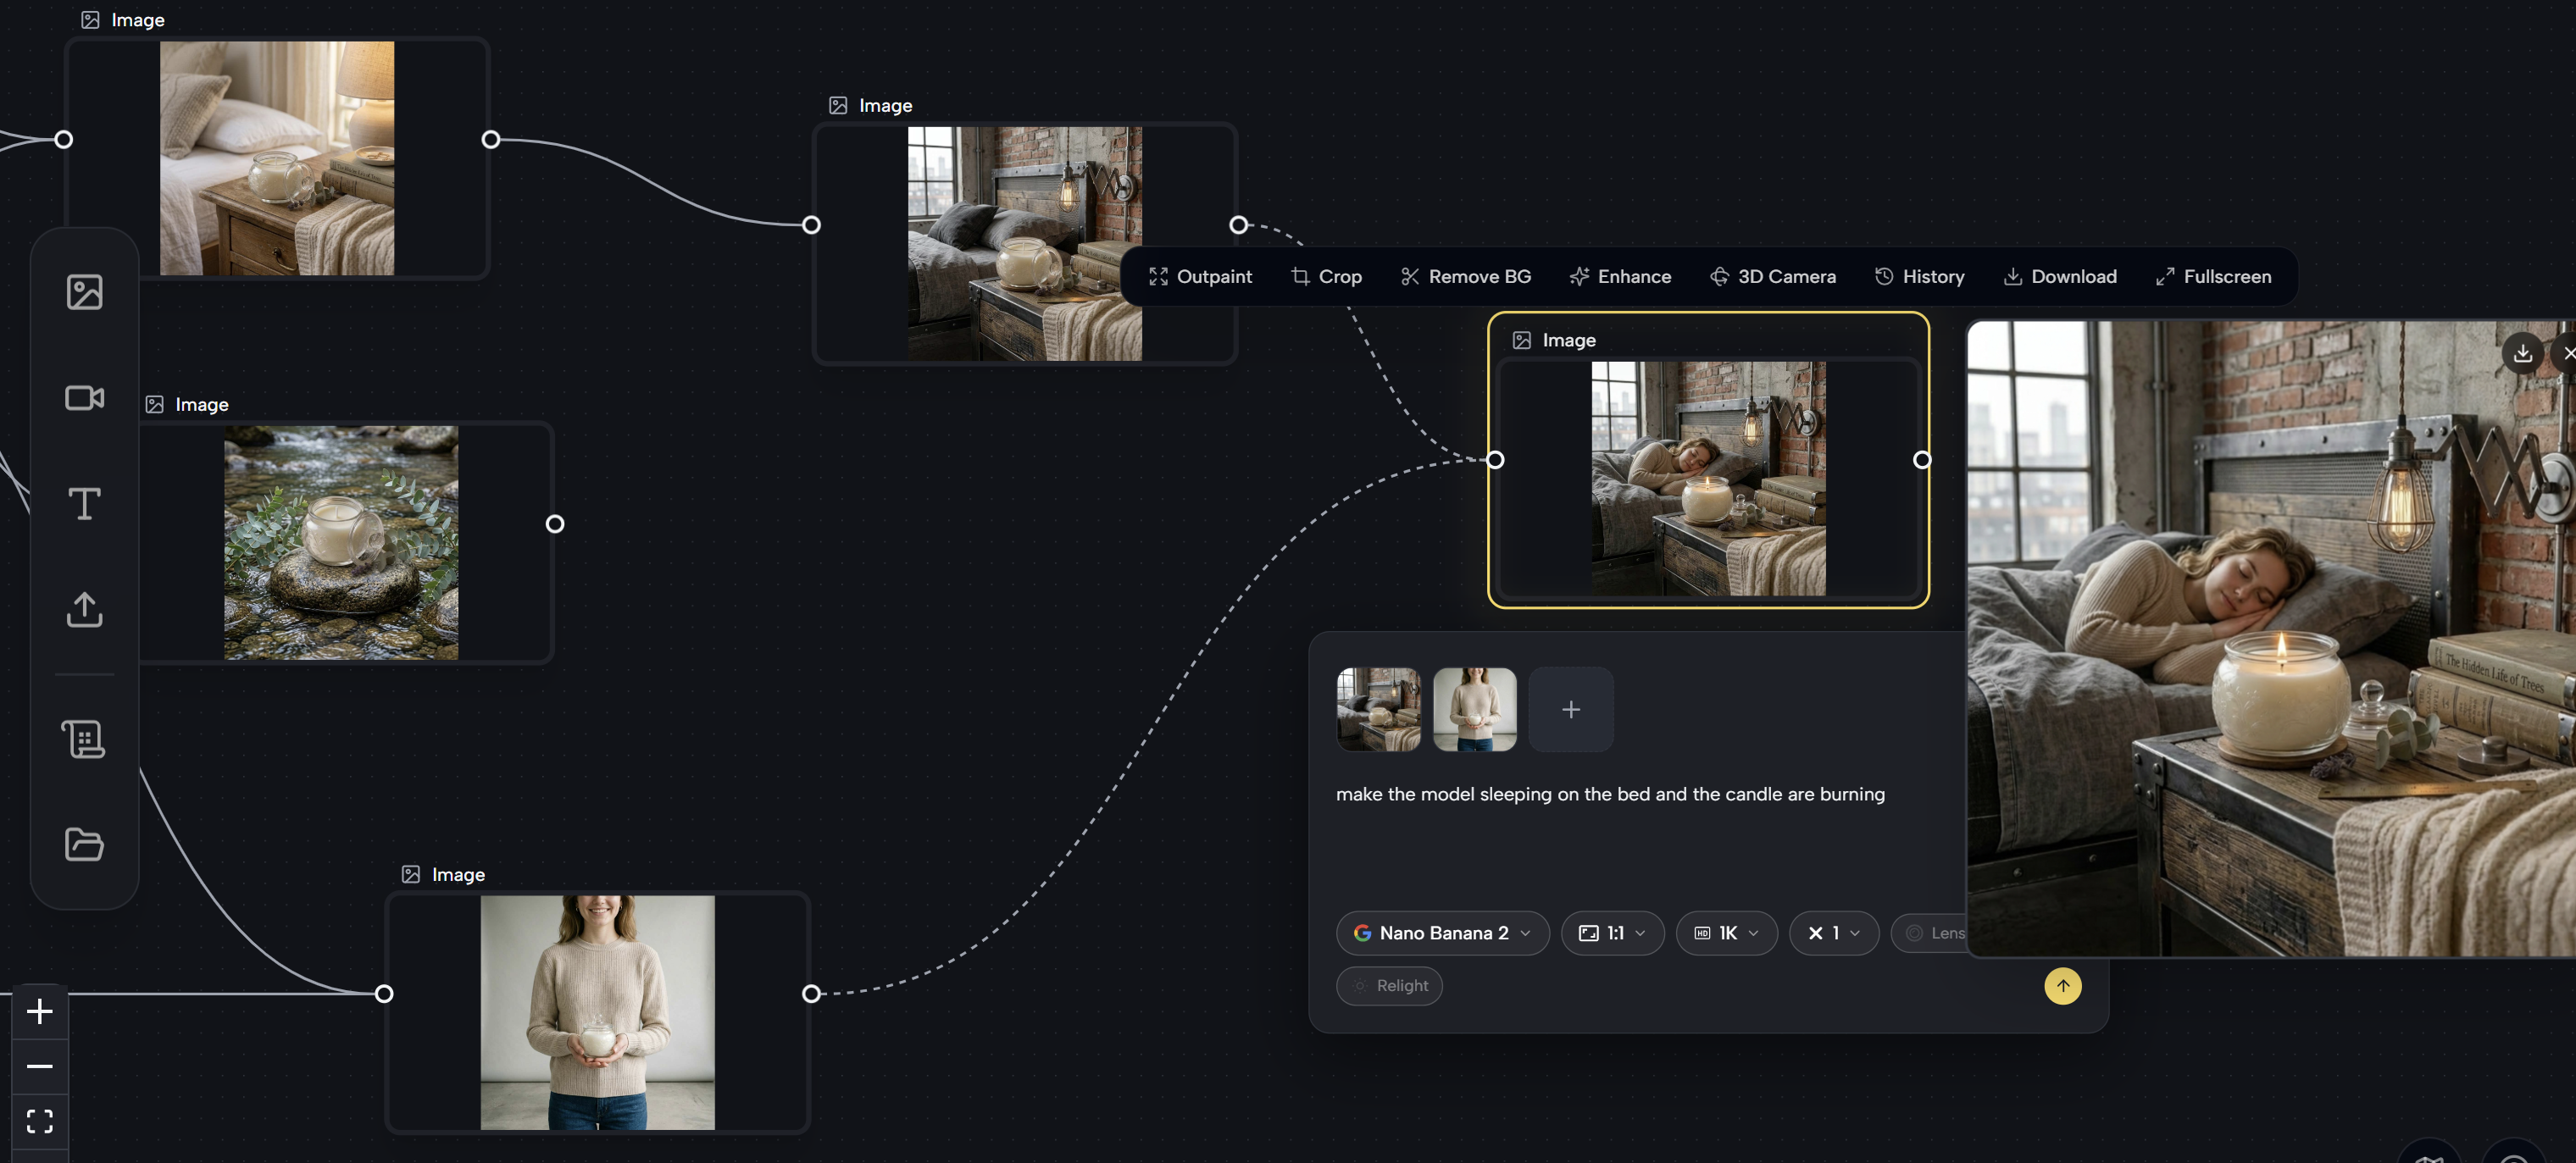
Connect Multiple Nodes
To merge two separate images into one scene — for example, placing both a model and a product into the same environment — you can connect multiple nodes to a single Image node. Click the output port of the first image, drag to create a new generation frame, then connect the output port of the second image to the left input of that same frame.
e.g."make the model sleeping on the bed and the product placing on the bedroom nightstand".
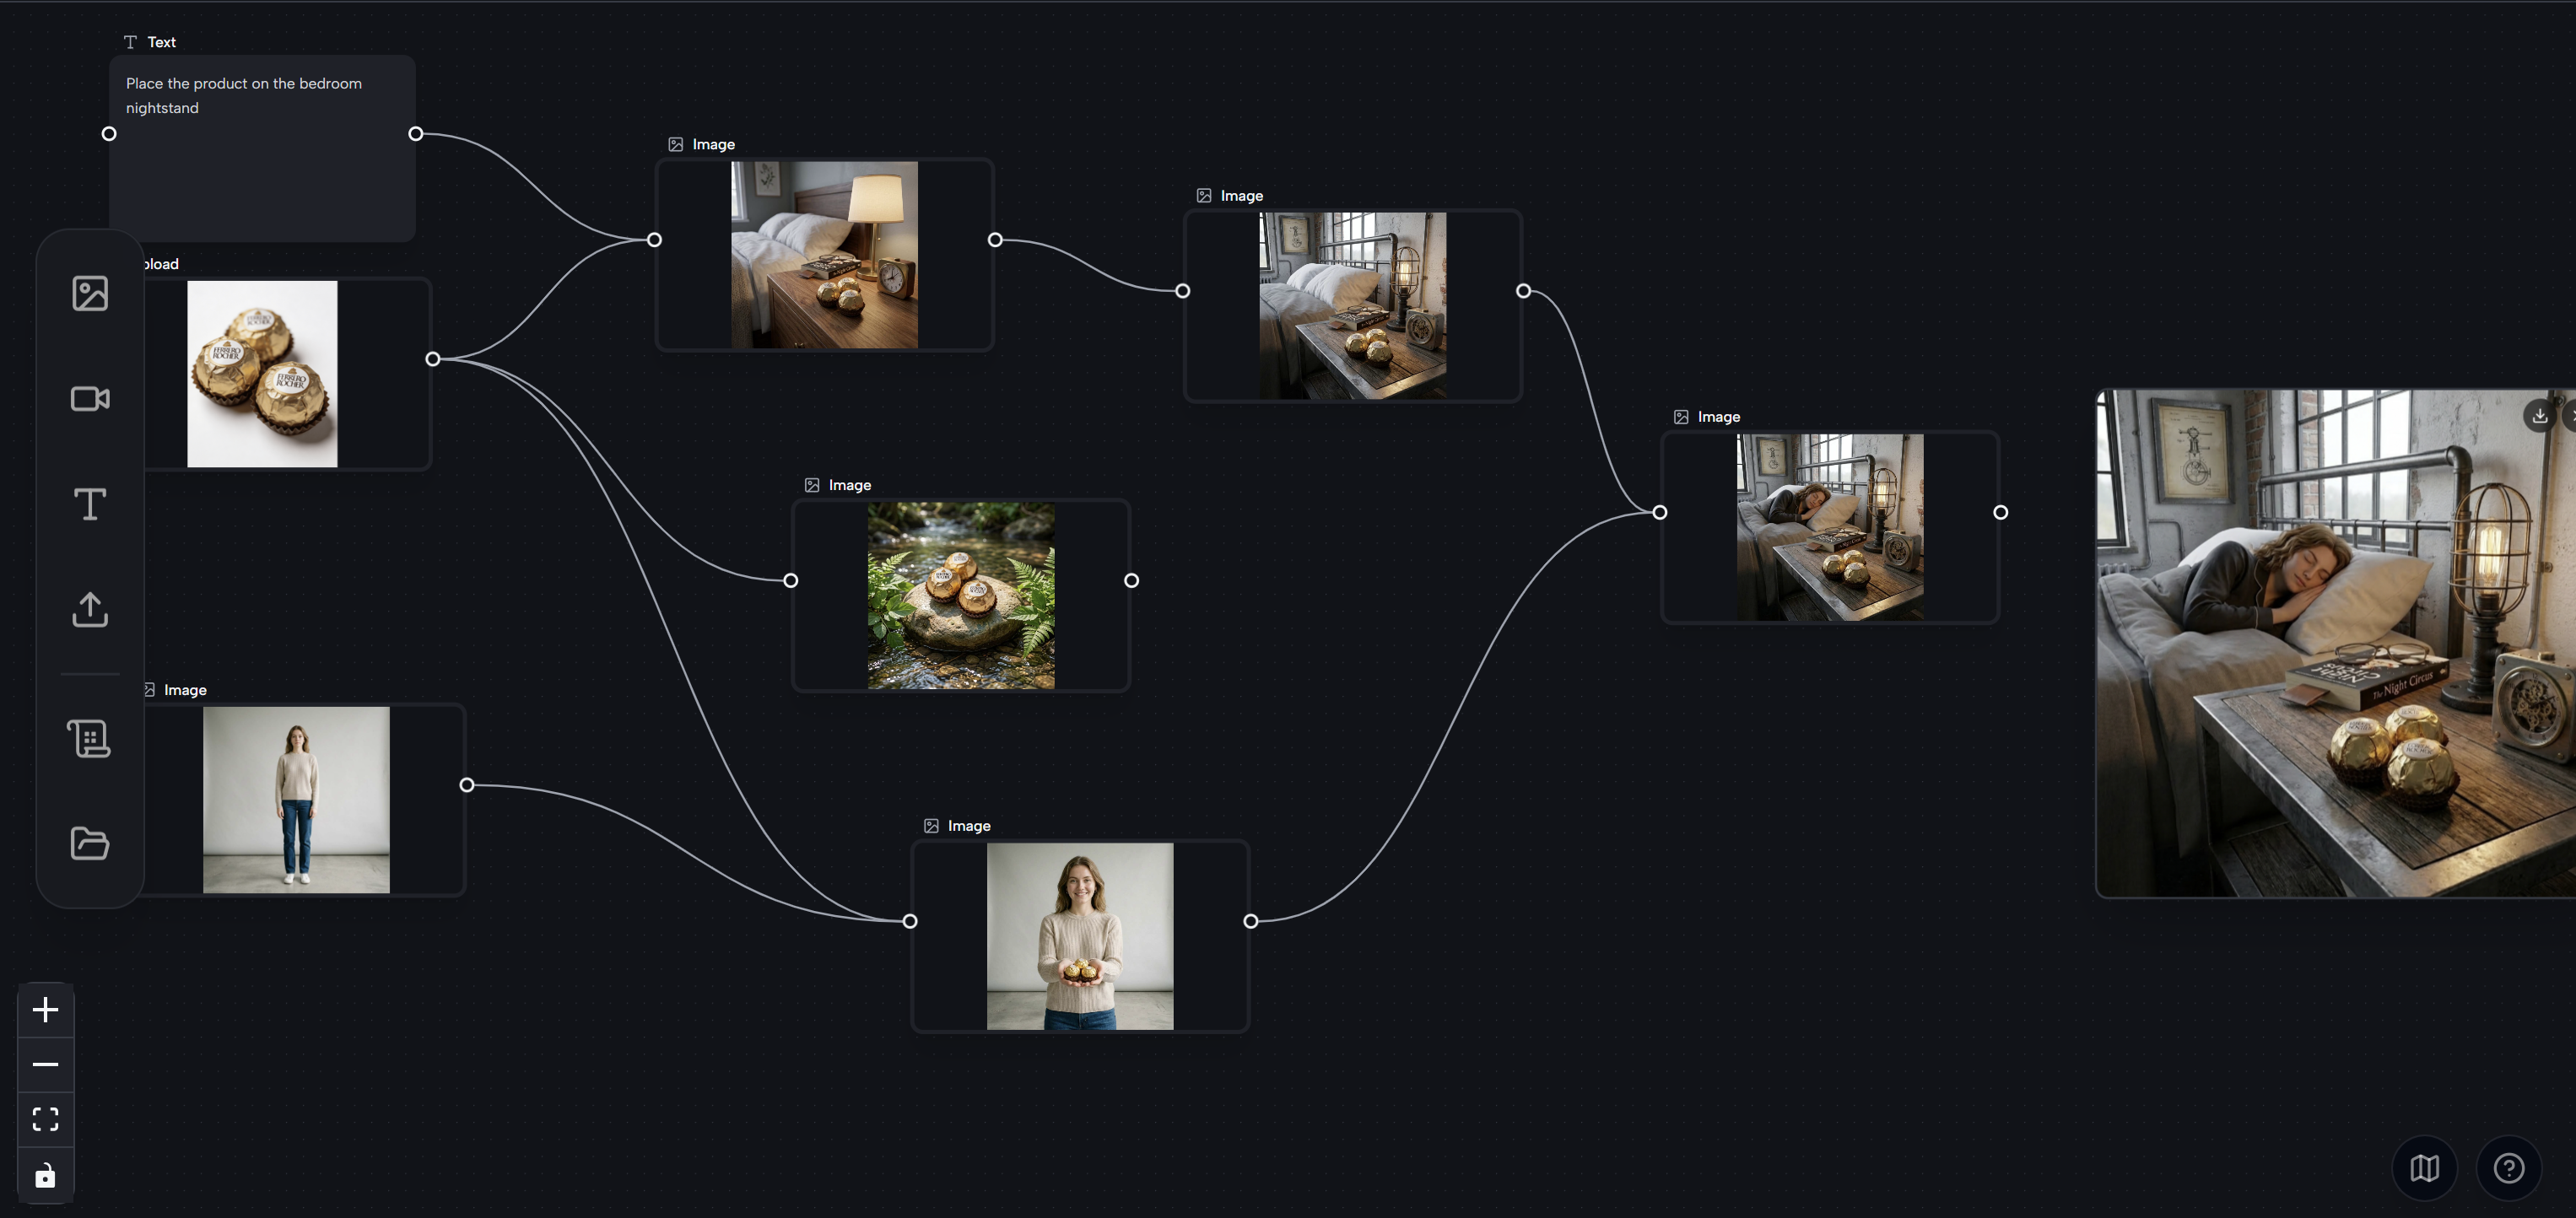
Complete the Whole Workflow
Continue dragging and connecting nodes to build your full pipeline — as many background scenes or style variants as you need. Each node remembers its own prompt and settings independently. When you're happy with the structure, your AI background workflow studio is done and ready to use as a template.
Step 3 — Generate Batch Variations
Apply the Background Changer Workflow
Once your product background changer template is set up, using it for the next product is simple: swap the photo in the first Upload node, then click Generate on each subsequent node in sequence. The prompts, model settings, and node connections all stay exactly as you built them — only the source image changes. This is the real productivity gain: one template, unlimited products.
How to Save the Background Changer Template
1. Navigate to the Project
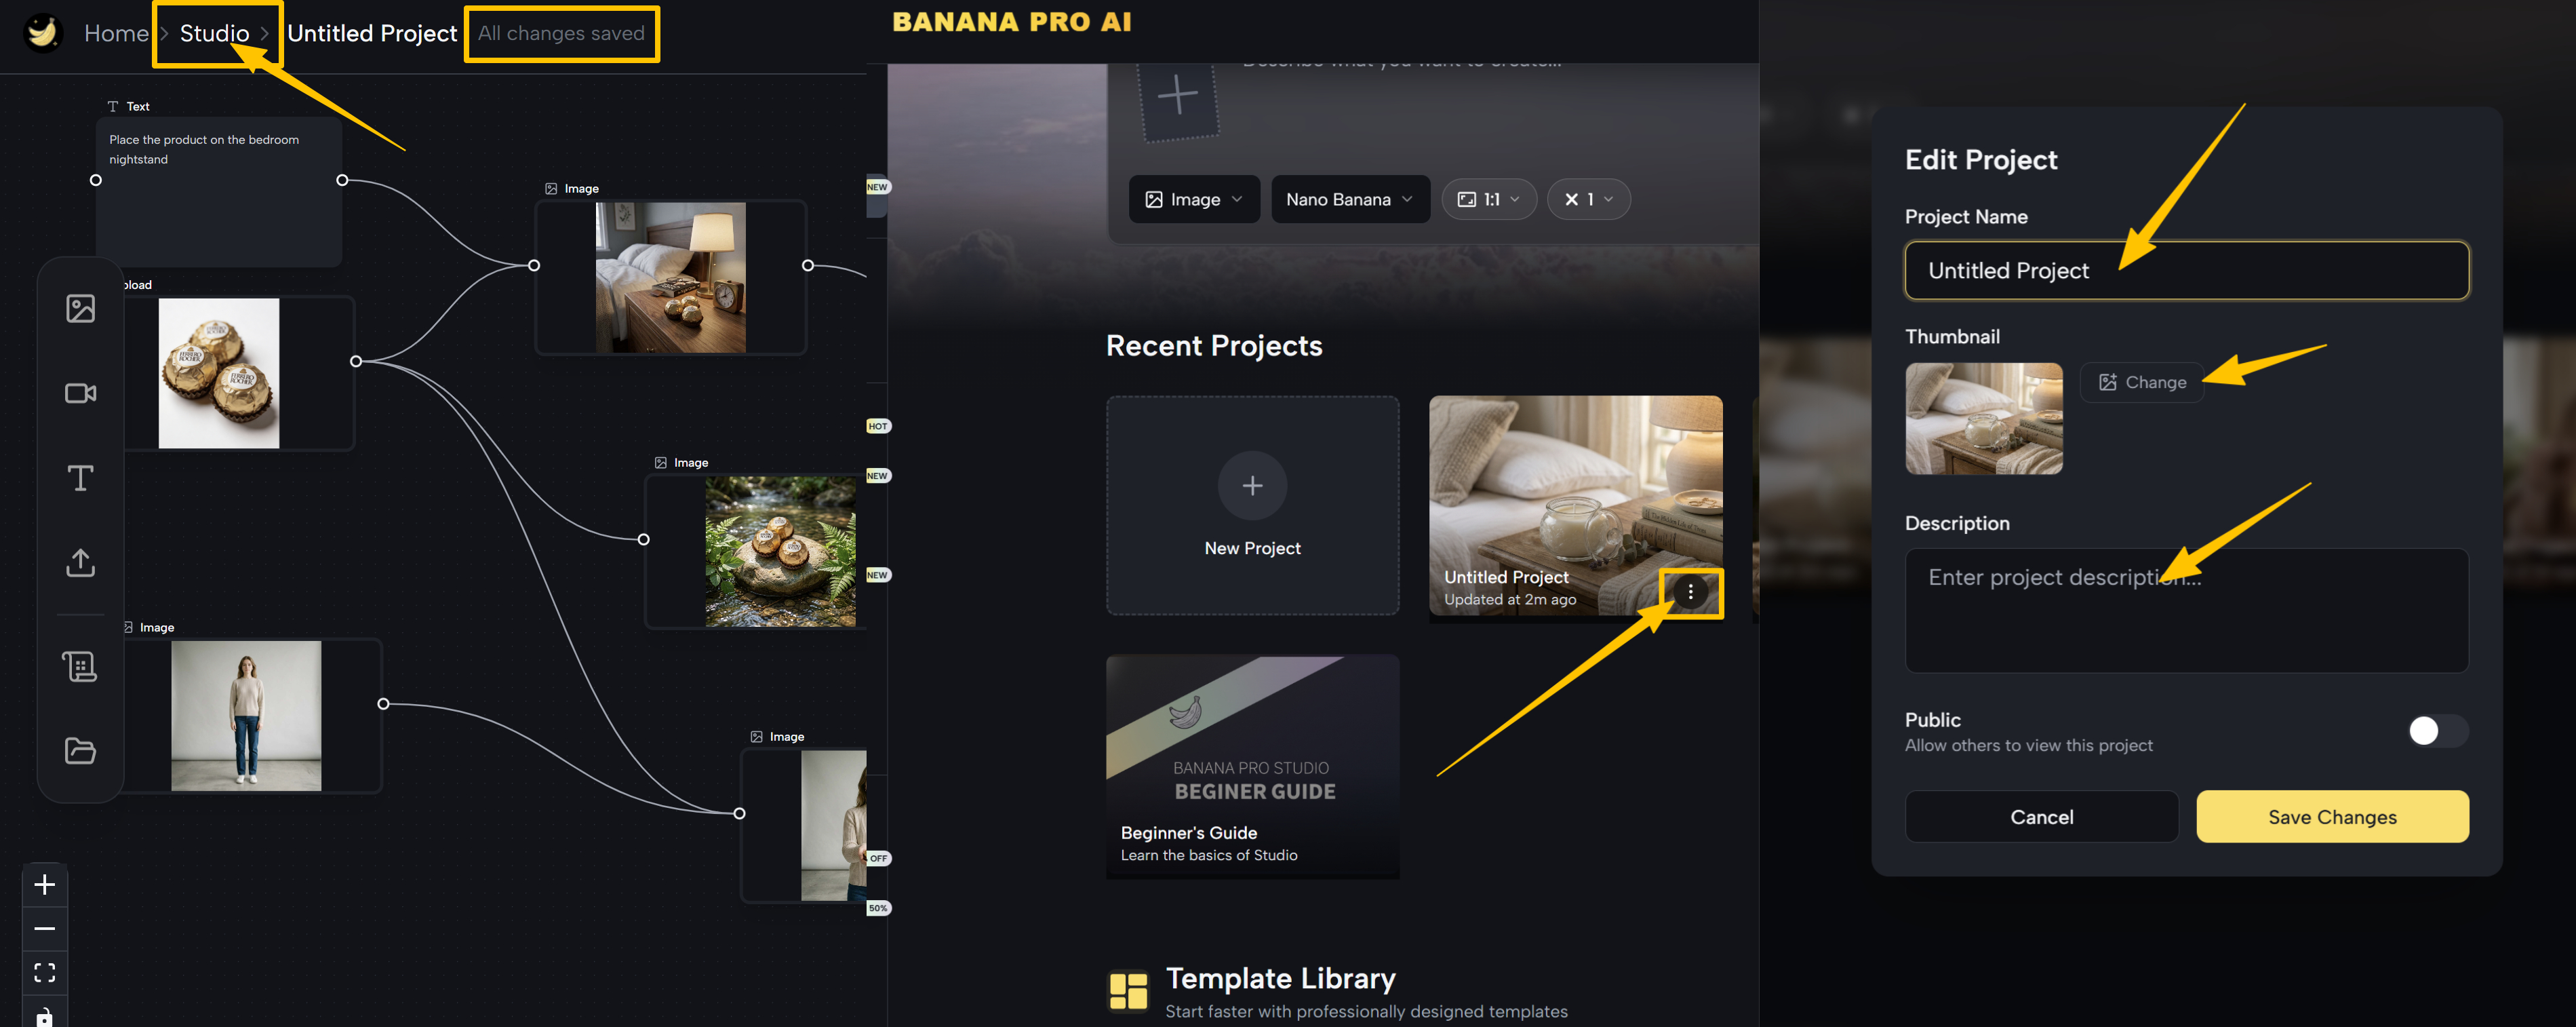
Once you see "All changes saved" in the top-left corner of the canvas, your template is safely stored. To give it a proper name, click Studio in the breadcrumb navigation to return to the Workflow Studio dashboard — you'll see all your recent projects with thumbnail previews
2. Name Your Project Clearly
Find the AI background changer project, then click the ⋯ (three-dot) menu icon that appears in the corner of the thumbnail. In the Edit Project dialog, replace "Untitled Project" with a descriptive name like "[Brand] — Product BG Template v1". You can also add a description and choose a thumbnail. Hit Save Changes when done.
Pro Tips & Common Mistakes
Always Start with A Clean Product Shot
The better your source image, the better the output. Use a photo where the product is well-lit, sharply in focus, and reasonably isolated — even a plain wall works.
Be Specific About What to Keep
Always write the prompt with "Keep the [product] exactly as-is — preserve its [shape / color / texture / label / handle]." The more specific you are about preserving product details, the less the AI will modify the product itself while replacing the background.
Avoid Vague Background Change Descriptions
"Nice background" or "outdoor setting" produces inconsistent results. Always specify: location type, lighting direction, color palette, atmosphere, and intended use case. More detail equals more controlled output.
Beyond Background Swapping: More Ways to Use AI Workflow Studio
AI background changer template is just the beginning. Because BananaPro AI Workflow Studio connects every generator and model on one infinite canvas, the same workflow logic applies to a much wider range of product photography challenges.
Multi-Scene Catalog Production
Upload one product photo, branch it into three Image Edit nodes — each with a different scene prompt (white studio, lifestyle kitchen, seasonal holiday). In a single session, every SKU gets three platform-ready variants without a single reshoot.
Image-to-Video Product Ads
Use Image Edit to place your product in a lifestyle scene, then drag the output handle and select Image to Video. Pass the scene to Veo 3 or Seedance with a motion prompt — camera push-in, rising steam, light shift. You get a polished 6–8 second product ad in one connected template, ready to publish directly to TikTok or Reels.
Virtual Model & Try-On Scene Compositing
Connect two Upload nodes — one with your product (a bag, a jacket, a pair of shoes), one with a model or environment reference — into a single Image node. Describe how they should appear together in the prompt. The model wears the item, holds it, or is placed in the scene alongside it.
FAQ About BananaPro AI Workflow Studio
Still have questions before you dive in? Here are the most common things users ask about BananaPro AI Workflow Studio.
Will My Generated Images Be Saved? Can I Access Them Later?
Yes — every image generated by any node is automatically saved. To view the history for a specific node, click on that node to select it, then click the History button in the menu that appears above the image. This will display a full log of all previously generated outputs for that node, along with the exact prompt used for each generation. Nothing gets lost, so you can freely iterate and come back to any earlier result at any time.
Can I Generate Both Images and Videos within the Same Workflow Studio?
Absolutely. BananaPro AI Workflow Studio brings together all of the platform's generators and models in one place. Once you've dragged a node onto the infinite canvas, you can choose between Image to Image or Image to Video and then select whichever model best fits your needs — from Grok Imagine and the Nano Banana series for image editing, to Veo 3 and Seedance for video generation. This means you can build a complete pipeline that goes from a raw product photo all the way to a finished video ad, without ever leaving the same infinite canvas.
How Many Credits Does It Take to Run A Workflow Studio?
Credit usage scales with your project — there's no fixed upper limit since it depends on how many nodes you run, which models you choose, and how many variants you generate. That said, the minimum cost to run a BananaPro AI workflow studio is just 2 credits per generation. Every new user receives 10 free credits on sign-up — no credit card required. You can top up your balance for free by signing in on consecutive days (daily check-in rewards), or you can subscribe to a monthly or annual plan for a larger credit allocation to support higher-volume creative work.
Do I Need Any Design or Coding Skills to Use the AI Workflow Studio?
None at all. The entire interface in the infinite canvas is drag-and-drop — you place nodes on the whiteboard and connect them visually. All AI instructions are written in plain natural language (your prompt). If you can describe what you want in a sentence, you can run a workflow studio well. The AI Workflow Studio is designed to be just as accessible for a first-time seller as it is powerful for a professional creative team.
Can I Use the Generated Images Commercially — for My Store, Ads, and Client Work?
Yes. All outputs from BananaPro AI Workflow Studio are exported watermark-free and come with full commercial usage rights. You can use them for e-commerce listings, paid advertising, client deliverables, print materials, and more. The infinite canvas is built specifically with commercial creators and sellers in mind.
Final Words
Start with one product, build your first background changer template, and keep refining it. Once your template works, you can use it again and again — turning ordinary product photos into polished, campaign-ready e-commerce visuals with BananaPro AI Workflow Studio.